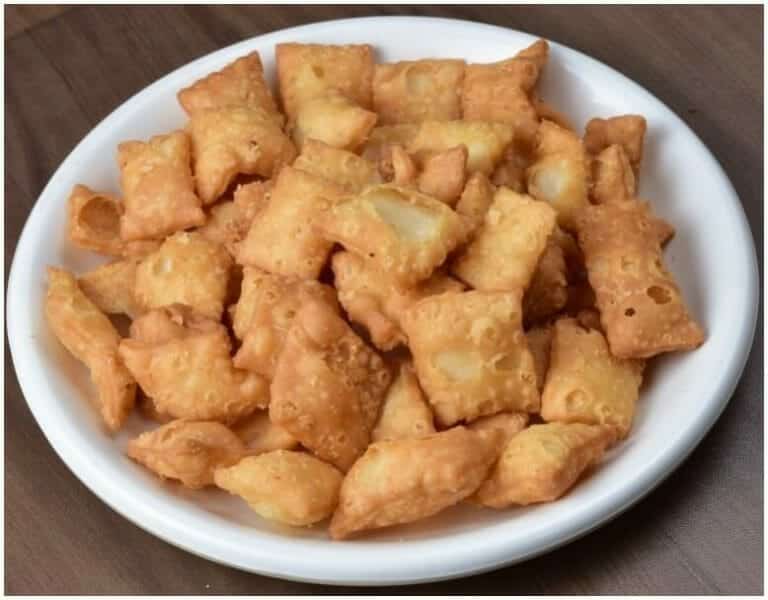

Ribbon Pakoda is one of those snacks that brings back childhood memories of rainy afternoons and hot tea. I remember watching my grandmother make these beautiful curly treats, wondering how she got them so perfectly crispy every time. The secret is in the dough consistency and oil temperature – get these right, and you’ll have restaurant-quality pakodas at home. This recipe uses just a handful of pantry staples but creates something truly special. Trust me, once you start making these at home, you’ll never buy store-bought ones again.
About the Recipe
This Ribbon Pakoda recipe is a winner because it’s foolproof and uses ingredients you probably already have. The combination of rice flour and gram flour gives these snacks their perfect crunch, while the ghee adds richness and helps bind everything together. What I love most is how the ribbon mould creates those gorgeous curly shapes that look so professional. You don’t need any fancy techniques or years of experience – just follow the simple steps and you’ll get crispy, golden pakodas that taste like they came from your favorite Indian snack shop.
Why You’ll Love This Recipe
First off, these Ribbon Pakoda are incredibly satisfying to make. There’s something so fun about pressing the dough through the mould and watching those perfect ribbons form in the hot oil. The texture is surely perfect – crispy on the outside with just the right amount of spice. They stay fresh for days when stored properly, making them perfect for unexpected guests or when you’re craving something crunchy. Plus, you can adjust the spice level to your liking. The best part? They’re made with simple, wholesome ingredients, so you know exactly what goes into your snacks. Kids love helping with this recipe too.

Cooking Tips
Getting the dough consistency right is key – it should hold together but not be too wet. If it feels dry, add a tiny bit of water. Make sure your oil is properly heated before you start frying. Test with a small piece of dough – it should sizzle immediately. Don’t overcrowd the pan, or the temperature will drop and your pakodas won’t be crispy. Keep the heat at medium to avoid burning while ensuring they cook through completely.
Serving and Storing Suggestions
This recipe serves about 4 people and takes roughly 30 minutes from start to finish. Serve these hot with mint chutney or your favorite dipping sauce alongside a steaming cup of tea or coffee. They taste amazing at room temperature too. Store completely cooled pakodas in an airtight container for up to a week. If they lose their crispness, just pop them in a hot oven for 2-3 minutes to refresh.
Similar Recipes
- Murukku
- Chakli
- Sev
- Omapodi
- Aloo Bhujia
Nutrient Benefits
Rice flour provides easily digestible carbohydrates and is naturally gluten-free, making these suitable for many dietary needs. Gram flour adds protein and fiber to keep you satisfied longer. The spices like red chilli powder and asafoetida aren’t just for flavor – they aid digestion and have anti-inflammatory properties. While these are fried snacks, the homemade version lets you control the oil quality and avoid preservatives found in packaged alternatives.

Ribbon Pakoda
Ingredients
- 1 cup Rice Flour
- 1/2 cup Gram Flour
- 3 tsp Ghee
- 1/2 tsp Asafoetida Powder
- 3 tsp Red Chilli Powder
- as required Oil
- as per taste Salt
Instructions
- Mix the rice flour, gram flour, asafoetida powder, salt, red chilli powder and ghee.
- Heat oil in a deep frying pan.
- Take some of the dough and pass it through a ribbon pakoda mould onto the hot oil.
- Deep fry until golden brown.
- Remove and drain excess oil.
- Store in an airtight container.
Recipe Video
Sign up for our newsletter
Add Awesome Cuisine as a Preferred Source
Frequently Asked Questions
Q: What if I don’t have a ribbon pakoda mould?
A: You can use a regular murukku press with the ribbon disc attachment, or even a piping bag with a star tip. Some people use a potato ricer in a pinch, though the shape won’t be as defined. The key is creating those wavy, ribbon-like strips that give this snack its characteristic look and texture.
Why are my pakodas not crispy enough?
This usually happens when the oil isn’t hot enough or the dough is too wet. Make sure your oil reaches the right temperature before adding the dough. Also check that your dough holds together without being sticky. Let them drain well on paper towels after frying to remove excess oil.
Can I make the dough ahead of time?
It’s best to fry them immediately after making the dough for the crispiest results. The dough can sit for about 15-20 minutes if needed, but cover it to prevent drying out. If it gets too dry, the pakodas might crack while frying.
How do I know when the oil is ready?
Drop a small piece of dough into the oil. If it sizzles immediately and rises to the surface, your oil is ready. The temperature should be around medium-high heat. Too hot and they’ll burn outside while staying raw inside; too cool and they’ll absorb oil and become soggy.