
Introducing Cheera Cutlets, a delightful twist on the classic cutlet recipe that brings the vibrant flavours of red spinach to the forefront. Red spinach, also known as Cheera, is not just a nutritional powerhouse but adds a beautiful hue to your dishes. This recipe is a creative way to incorporate this leafy green into a tasty snack or appetizer.
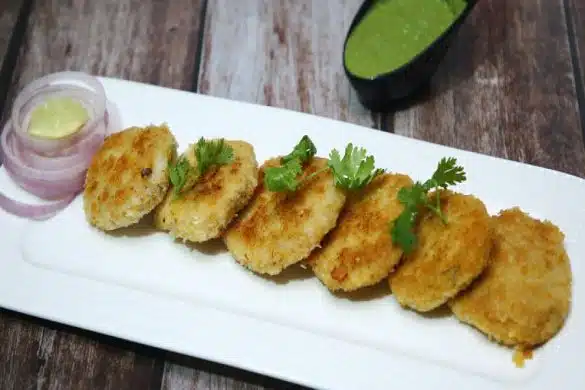
Imagine biting into a crisp, golden exterior that gives way to a soft and flavorful centre. That’s what Cheera Cutlets offer – a perfect balance of textures and tastes. The combination of red spinach, onions, green chilies, and aromatic spices results in a mouthwatering treat that’s both satisfying and nutritious.
You’ll start by sautéing red spinach, onions, green chilies, ginger, and curry leaves to make these cutlets. This process not only enhances the flavors but also helps reduce the moisture content of the spinach. Then, you’ll combine this mixture with mashed potatoes, soaked and squeezed bread, coriander powder, garam masala powder, and a hint of salt. Shape the mixture into small cutlets.
The cutlets get an extra flavour and crunch by rolling them in powdered rusk before frying. The rusk coating ensures a delightful crispiness that contrasts beautifully with the tender filling. Once the cutlets are coated, they are deep-fried to a golden brown perfection.
Serve these Cheera Cutlets hot with your favourite chutney or ketchup. They make for an excellent tea-time snack, a great appetizer for parties, or a tasty addition to your lunch or dinner menu.
 Cutlet 1")
Cheera Red Spinach Cutlet
About the Recipe
This recipe transforms humble red spinach into golden, crispy cutlets that everyone will enjoy. What makes this dish special is how it combines nutrition with taste seamlessly. The red spinach provides incredible health benefits while the potatoes and bread create that perfect texture we all crave. You don’t need any fancy ingredients or complicated techniques. Just fresh vegetables, basic spices, and a little patience while frying. It’s a wonderful way to introduce kids to leafy greens without any fuss. The recipe works great for tea-time snacks, lunch boxes, or even light dinners.
Why You’ll Love This Recipe
These cutlets strike the perfect balance between healthy and indulgent. The red spinach gives them a lovely color and earthy flavor that’s not overwhelming at all. I love how the crispy rusk coating contrasts beautifully with the soft, flavorful interior. They’re budget-friendly too, using ingredients you probably already have at home. The cooking process is straightforward, making it perfect for beginners who want to try something new. You can make a big batch and freeze them for later. They taste amazing with tomato ketchup, mint chutney, or even a simple yogurt dip. Your family will be asking for these again and again.
Cooking Tips
Make sure to squeeze out excess water from the cooked spinach mixture to prevent soggy cutlets. The bread slices should be soaked just enough to squeeze easily but not falling apart. When shaping cutlets, wet your hands slightly to prevent sticking. Don’t make them too thick or they won’t cook evenly. Test the oil temperature by dropping a small piece of the mixture – it should sizzle immediately. Fry on medium heat to get that perfect golden color without burning the outside while keeping the inside raw.
Serving and Storing Suggestions
This recipe makes about 12-15 small cutlets and takes roughly 30 minutes to prepare and cook. Serve them hot with tomato ketchup, green chutney, or yogurt dip. They make excellent tea-time snacks or can be packed in lunch boxes. Store leftover cutlets in the refrigerator for up to 3 days. You can reheat them in a pan with a little oil to restore crispiness. For longer storage, freeze the shaped cutlets before frying and cook them directly from frozen when needed.
Similar Recipes
- Spinach Tikki
- Vegetable Cutlets
- Aloo Tikki
- Beetroot Cutlets
- Cabbage Cutlets
Nutrient Benefits
Red spinach is packed with iron, vitamins A and C, and folate, making these cutlets surprisingly nutritious. The potatoes provide energy and potassium, while the spices offer antioxidants and digestive benefits. Ginger helps with digestion and adds anti-inflammatory properties. These cutlets give you a good dose of fiber and protein from the vegetables and bread. It’s a smart way to sneak extra nutrients into your family’s diet while serving something they’ll actually enjoy eating.
 Cutlet 2")
Cheera (Red Spinach) Cutlet
Ingredients
- 2 cups Red Spinach (Cheera)
- 1 cup Onions (grated)
- 4 Green Chillies (finely chopped)
- 1- inch piece Ginger (chopped)
- 1/2 cup Potato (cooked and mashed)
- 1/2 cup Bread Slices (soaked and squeezed)
- 1/2 tsp Coriander Powder
- 1/2 tsp Garam Masala Powder
- 1 cup Rusk (powdered)
- 2 tbsp Maida
- Handful of Curry Leaves
- Salt to taste
Instructions
- Heat a pan over medium heat.
- Add red spinach, grated onions, chopped green chillies, ginger, and curry leaves to the pan.
- Cover and cook for 1 to 2 minutes.
- Transfer the mixture to a bowl.
- Add mashed potatoes, soaked and squeezed bread, coriander powder, garam masala powder, and salt to the bowl. Mix well and shape the mixture into small cutlets.
- Mix maida with 3/4 cup of water in a separate bowl to create a thin paste.
- Sprinkle this paste over the cutlets.
- Spread the powdered rusk on a plate and roll the cutlets until well coated.
- Heat oil in a deep pan.
- Fry the cutlets on both sides until they turn brown and crisp.
- Remove from the oil and drain excess fat.
- Serve hot with ketchup or chutney.
Sign up for our newsletter
Add Awesome Cuisine as a Preferred Source
Frequently Asked Questions (FAQ):
Can I use other greens instead of red spinach for these cutlets?
You can substitute red spinach with other greens like spinach, kale, or even finely chopped fenugreek leaves for a different flavour profile. Experiment to find your favourite!
What are some suitable pairings for Cheera Cutlets?
Cheera Cutlets pair wonderfully with mint chutney, tamarind chutney, or a spicy tomato sauce. They also make a great addition to a sandwich or burger for an extra layer of flavour and texture.
Can I make Cheera Cutlets ahead of time and freeze them?
Absolutely! After shaping the cutlets, arrange them in a single layer on a baking sheet and freeze until solid. Once frozen, transfer them to a zip-top bag and store them in the freezer for up to two months. When ready to cook, you can fry them directly from the freezer, adding a few extra minutes to the cooking time.
Note: image is for illustration purposes only and not that of the actual recipe.


 21")
 22")