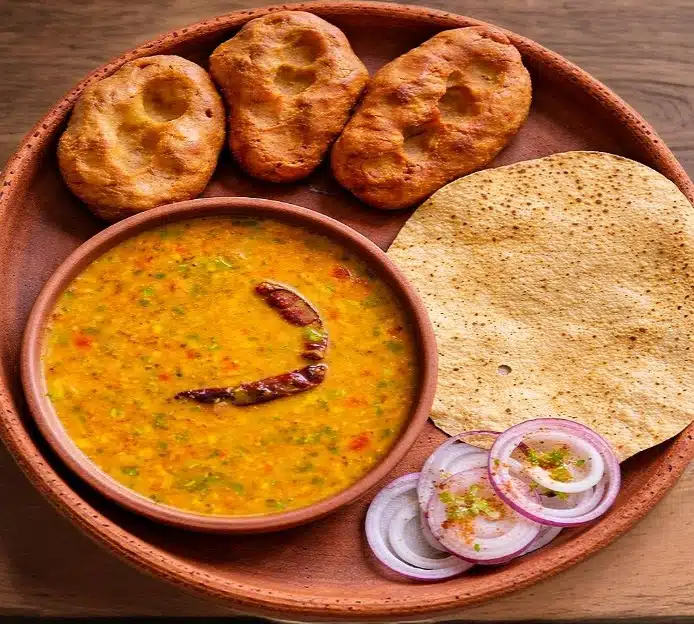
Rajasthani Bati came into my regular cooking life because my husband kept asking for dal baati whenever we had guests over for Sunday lunch. He grew up eating it in Rajasthan and had very firm opinions about what it should taste like. The first few times I made it, the batis came out dense in a bad way — underbaked inside, browning too fast outside.
It took a few tries before I understood that the long second bake at lower temperature is not optional. That slower phase is what dries the bati through and gives it that almost crumbly, cooked-through texture. Now when I pull a tray out of the oven and the kitchen smells of toasted wheat and warm ghee, I know we are about forty minutes away from a proper meal.
About the Recipe
Every ingredient here is a pantry staple — whole wheat flour, ghee, ajwain, baking powder. Nothing needs to be sourced specially or prepared ahead. From mixing the dough to pulling the batis out of the oven, you are looking at roughly 60 to 75 minutes, with most of that being hands-off baking time. I reach for this recipe most often on weekends when I want to make dal or panchmel sabzi alongside, because the baking time gives me enough room to get the rest of the meal together without rushing.
Why you will love this recipe
The thing that keeps this recipe in my rotation is how different the baked version tastes from anything else made with the same handful of ingredients. Whole wheat flour, ghee, and ajwain are things I always have. But when you bake the dough low and slow, then soak the finished rounds in warm ghee for a good hour, you get something with a firm, sandy bite outside and a faintly layered inside.
The ajwain gives every bite a slight warmth that sits just beneath the richness of the ghee. It is the kind of bread that pairs best with something saucy — a thick dal or a spiced vegetable — where the bati can absorb and hold.
Cooking Tips
The biggest beginner mistake with bati is pulling them from the oven too soon. If they look pale on top and you are not sure, give them more time. Underbaked bati feels gummy at the centre when you break one open. The two-stage baking method — high heat to set the outside, lower heat to dry through — matters.
Do not skip the second phase, and do not rush it by keeping the temperature high. Also, if your dough feels sticky, add water one tablespoon at a time. Bati dough should be notably stiffer than chapati dough.
Top Tips
- The dough should feel firm and tight, almost hard to press. If it feels soft like roti dough, it has too much water and the bati will not hold its shape.
- Soak the batis in ghee straight from the oven while they are still hot. That heat helps them absorb the fat properly. Soaking cold batis gives a much less satisfying result.
- If you are using the stovetop and frying method, make sure the oil is at medium heat. Oil that is too hot will brown the outside before the inside cooks through.
- Batis baked in the oven keep better than fried ones. Store baked batis in an airtight container and reheat them in the oven at 160C for about 8 to 10 minutes.
- I always press the balls slightly flat before placing them on the tray. This helps them bake evenly rather than staying raw at the thickest point.
- Ajwain has a strong flavour, so measure it. A quarter teaspoon is enough. More than that and it starts to overwhelm everything else.
Serving and Storing Suggestions
This recipe makes around 8 to 10 medium batis, serving 3 to 4 people. Prep time is around 15 minutes and total cooking time including soaking is about 90 minutes. Serve batis hot with dal, churma, or a dry vegetable dish. Leftovers keep well in an airtight container for up to 2 days at room temperature.
Reheat in a low oven rather than a microwave, which tends to make them chewy. Fried batis are best eaten the same day.
Similar Recipes
- Rajasthani Dal Baati Churma
- Missi Roti
- Baajre ki Roti
- Litti Chokha
- Puri
Nutrient Benefits
Whole wheat flour retains the bran and germ that refined flour loses, which means these batis carry more fibre and B vitamins per serving than white-flour breads. Ajwain has long been used in Indian cooking to aid digestion, particularly with heavier wheat-based foods. The ghee here is not just flavour — it provides fat-soluble vitamins and helps the body absorb them. This is still a calorie-dense recipe, particularly after the ghee soak, so portion size is worth keeping in mind.
Rajasthani Bati
Ingredients
- 1 cup Whole Wheat Flour
- 1/4 cup Ghee melted
- 1/4 tsp Ajwain (Carom Seeds)
- Baking Powder (a pinch)
- Salt as per taste
Instructions
- Mix the flour, baking powder and a pinch of salt in a bowl.
- Add 3 tblsp of ghee and mix well until it resembles bread crumbs.
- Add the carom seeds and 1/4 to 1/2 cup of water.
- Knead well to make a stiff, pliable dough.
- Make medium size balls of the dough and place them on a baking tray lined with sheet.
- Place it in a preheated oven at 200C/400F and bake for 12 to 15 minutes or until they start to turn light brown.
- Reduce temperature to 180C/360F and bake for another 15 to 30 minutes or until crispy and fully cooked.
- Remove the batis and soak them in the ghee for 60 to 90 minutes.
- Remove and serve at once.
If you do not have an Oven, then follow the steps below:
Method:
- Follow steps #1 to #4 from above.
- Bring a large pot of water to boil.
- Drop the balls and simmer until they float to the top.
- Drain well and keep aside.
- Heat oil in a deep frying pan over medium flame.
- Deep fry the balls until light golden brown.
- Remove, drain excess oil and serve hot.
Sign up for our newsletter
Add Awesome Cuisine as a Preferred Source

Frequently Asked Questions
My batis are brown on the outside but raw and doughy inside. What went wrong?
This usually means the oven temperature was too high during the first stage, or you skipped the second lower-temperature bake. The inside needs extended time at a gentler heat to cook through. Next time, follow both baking stages — 200C first to set the crust, then 180C for the full 15 to 30 minutes to dry the centre.
Can I make bati without an oven or deep frying?
The stovetop boil-and-fry method in the recipe works well and is a common approach in many households. Boiling first cooks the dough through, and the frying afterwards gives the outside its colour and a bit of crispness. The texture will be slightly different from oven-baked bati, but the result is still very satisfying.
How do I know when the batis are fully cooked?
Break one open. The inside should look dry and cooked through with no raw, wet dough at the centre. If it still looks pale and dense inside, return the batch to the oven for another 10 minutes and check again.
Can I reduce the amount of ghee in the soaking step?
You can, but it changes the end result noticeably. The ghee soak is what softens the hard crust slightly and adds the richness that makes bati taste like bati rather than a plain wheat roll. If you want to cut back, soak for 30 minutes instead of 60 to 90, and use just enough ghee to coat each one rather than submerging them fully.
Can I prepare the dough ahead of time and bake later?
Yes. The dough holds well in the refrigerator for up to 24 hours. Cover it tightly with cling film or place it in an airtight container. Let it sit at room temperature for about 20 minutes before shaping and baking, so it softens slightly and is easier to roll into balls.