
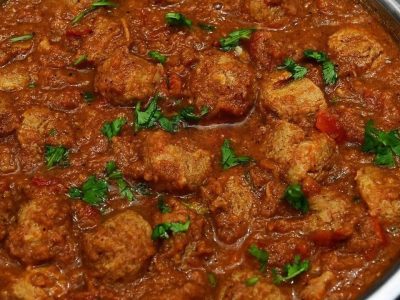
This mutton keema balls recipe brings together tender mince balls and a thick, well-spiced gravy with fried potato pieces. The keema is first mixed with ghee and salt and left to rest in the refrigerator for several hours. This firms up the mince enough to roll into neat balls without them breaking apart in the gravy. The gravy is a straightforward masala base built with onions, ginger garlic paste, tomato puree and ground spices. The keema balls go in raw and cook directly in the gravy, absorbing its flavour as the sauce thickens around them.

About the Recipe
The recipe runs two processes in parallel. The keema rests in the refrigerator while you build the gravy, so there is no wasted time. Frying the potatoes separately before adding them to the masala keeps them from turning mushy later. Cooking until the oil separates from the masala before adding water is the step that ensures the spices are properly cooked and the gravy has a good base. Serve with Mutton Pulao or plain rice.
Why You Will Love This Recipe
The keema balls cook directly in the gravy, so they stay moist and take on the full flavour of the masala. You also get two textures in the same bowl: soft, yielding keema balls and fried potato pieces that hold their shape. The ghee mixed into the keema before resting adds a richness that plain mince does not have. The steps are simple, and the result is a dish that pairs naturally with plain rice, which soaks up the thick gravy well.
Cooking Tips
The most common mistake is skipping or shortening the refrigerator resting time. If the keema is not firm enough, the balls will fall apart the moment they hit the hot gravy. Six to seven hours is the minimum. When you add the keema balls to the gravy, do not stir aggressively for the first few minutes. Let them set slightly before moving them. Keep the masala on a low flame and wait until the oil visibly separates before adding water, otherwise the gravy can taste raw.
Top Tips
- Rest the keema in the refrigerator for the full 6 to 7 hours. Shorter resting means the balls will not hold their shape in the gravy.
- Keep the flame low when stirring the masala after adding the spices. High heat will cause the spices to stick and burn before the onions and tomato puree have cooked properly.
- Fry the potatoes until they have a light golden crust before setting them aside. This stops them from breaking apart when added back to the gravy.
- Wait until you can see oil separating at the edges of the masala before adding water. That is the sign the tomato puree and spices are fully cooked.
- Add the keema balls gently and let the gravy come to a boil before reducing the heat. Boiling too vigorously can break the balls apart.
- Add garam masala only at the end, after the gravy has thickened, so the aroma is fresh when you serve.
Serving and Storing Suggestions
Serve the mutton keema balls hot with plain steamed rice, which is the natural pairing for this thick gravy. Keema Chapati or plain chapati also works well. Leftovers keep in the refrigerator for up to two days in a covered container. Reheat on a low flame with a small splash of water to loosen the gravy, which thickens considerably once cold. Avoid freezing the cooked balls as the texture can change on thawing.
Similar Recipes
- Mutton Kola Urundai Kuzhambu
- Keema Kofta
- Mutton Kofta
- Erachi Urundai (Mutton Balls)
- Aloo Gosht (Mutton with Potatoes)
Nutrient Benefits
Mutton keema is a good source of protein and provides iron and B vitamins. Potatoes contribute carbohydrates that make the meal filling. Ghee adds fat-soluble nutrients and helps carry the flavour of the spices. Coriander leaves add a small amount of vitamin C and a bit of freshness to the finished dish.

Mutton Keema Balls
Ingredients
- 500 gms Mutton Keema
- 250 gms Chopped onion
- 4 pieces Potato
- 2 tsp Ginger Garlic Paste
- 2 to 3 pieces, chopped Garlic
- Tomato Puree
- 3 -4 pieces Green Chillies
- 2 pieces Bay Leaves
- 2 pieces Red Chilli
- 1 tsp Turmeric Powder
- 1 1/2 tsp Red Chilly Powder
- 1 1/2 tsp Cumin Powder
- Salt - to taste
- 1/2 cup Oil
- 8 tbsp Ghee
- Coriander Leaves - for Garnishing
- 1 tsp Garam Masala
Instructions
- Mix the mutton keema with ghee and salt and keep the mixture in refrigerator for 6-7hrs.
- Cut the potatoes in pieces.
- Heat oil in a pan and fry the potatoes.
- Take out the fried potatoes and add bay leaves and red chillies to the pan.
- Add the chopped garlic to the pan and wait for the smell to come out.
- Then add chopped onion and fry till golden brown.
- Add green chillies, ginger garlic paste, turmeric powder, cumin powder, red chilli powder and salt to taste.
- Stir the mixture continuously in a low flame.
- Then add the tomato puree to the above mixture and again stir the mixture.
- Stir the mixture till oil comes out from the mixture.
- Add the fried potatoes and mix well.
- On the other hand now take out the Mutton from refrigerator and prepare small balls from the mixture.
- Then add 1 ½ cup of water to the mixture on pan.
- Add the small mutton keema balls to the gravy and let it comes to boil.
- Cook till the gravy becomes thick.
- Add garam masala to the gravy.
- Garnish with coriander leaves.
- Serve hot with plain rice.
Sign up for our newsletter
Add Awesome Cuisine as a Preferred Source

Frequently Asked Questions
Can I reduce the refrigerator resting time for the keema?
It is better not to. The resting time allows the ghee to firm up inside the mince, giving the mixture enough structure to hold together as balls in the hot gravy. If you cut the resting time to two or three hours, the balls are likely to break apart during cooking. If you are short on time, shape the balls after the refrigerator rest and place them in the freezer for 30 to 40 minutes, which firms them up further before they go into the gravy.
How do I know when the masala is ready before adding water?
Watch the edges of the mixture in the pan. When the oil begins to separate and pool around the sides and surface of the masala, the tomato puree and spices have cooked through. The mixture will also stop looking wet and will start pulling away from the sides of the pan slightly. This usually happens after consistent stirring on a low flame for several minutes after adding the tomato puree.
Can I use lamb mince instead of mutton keema?
Yes, lamb mince can be used as a direct substitute. Lamb is generally more tender than mutton and will cook a little faster in the gravy, so check the balls for doneness a few minutes earlier. The flavour will be slightly milder than mutton but the recipe works well either way.
Why do I need to fry the potatoes separately before adding them to the gravy?
Frying the potatoes first gives them a light crust on the outside, which helps them hold their shape when added back to the gravy and simmered with the keema balls. If you add raw potato pieces directly to the gravy, they tend to soften too much and can break apart by the time the keema balls are cooked through.
What is the right consistency for the finished gravy?
The recipe calls for cooking until the gravy becomes thick. You are looking for a gravy that coats the back of a spoon and is not watery or runny. It should cling to the keema balls and potato pieces when served. If it thickens too much before the keema balls are fully cooked, add a small amount of hot water and continue cooking on a low flame.





awesome……………..nothing to say more……………….