Steamed Vada Curry is one of those recipes my neighbour Lakshmi and I have argued about more than once. She insists the vada must be fried for the gravy to absorb properly. I have always disagreed. When you steam the dal, press it flat on an idli plate, and cut it into squares after cooling, those pieces soak up the coconut-chilli gravy just as hungrily as any fried batch would.
What I keep coming back to is the texture of the steamed vada after it sits in the curry for a few minutes. It holds its shape at the edges but goes soft and almost pillowy at the centre, and that contrast is what makes this dish feel satisfying rather than heavy. I make this most Saturday mornings, usually pairing it with plain dosas or thick idlis pulled fresh off the cooker.
About the Recipe
All the ingredients here are standard South Indian pantry staples. Bengal gram dal and toor dal are easy to find at any local kirana or supermarket, and fresh coconut is the one item worth sourcing properly rather than using dried. The active cooking time runs to about 45 minutes once the dal has soaked, making this practical for a morning meal without being rushed. I would make this on a Sunday when the family is around and I want something filling that does not leave me standing over a kadai for an hour managing a frying temperature.
Why you will love this recipe
The steaming method means you prepare the vada in one batch, set it aside, and focus entirely on the gravy while it cools. No oil splattering, no frying in rounds. The coconut and poppy seed paste gives the gravy a richness that thickens naturally as it simmers, so you are not adding flour or extra starch to pull it together.
The ten green chillies sound alarming but the coconut and the body of the dal balance the heat well. I find this gravy smells especially good at the point when the ground paste goes into the hot oil and fries for a few minutes. That sharp, warm fragrance is the signal that you are almost there.
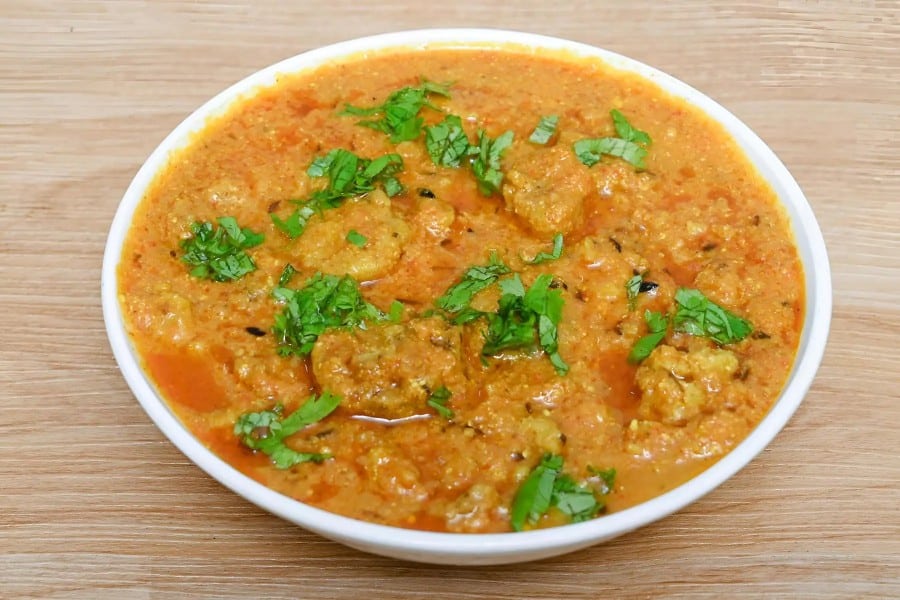
Cooking Tips
The most common beginner mistake is adding the steamed vada pieces too early, while the gravy is still thin. Wait until the gravy has boiled and reduced slightly before adding the squares, otherwise they absorb too much liquid and break apart. Do not skip frying the ground paste before adding water. That step cooks out the raw coconut flavour, which would otherwise make the gravy taste flat and slightly bitter. Keep the heat at medium throughout the gravy cooking to avoid scorching the paste at the bottom of the kadai.
Top Tips
- Soak the dal for the full hour. Less than that and the paste will grind too coarse and may not steam through completely in the centre.
- Grease the idli plate generously before pouring the dal mixture. If it sticks, the squares will break when you try to cut and lift them.
- Let the steamed vada cool fully before cutting. Cutting it warm causes it to crumble along the edges.
- Use small onions in the vada if you want a stronger flavour hit. Large onions work but tend to turn sweeter when mixed into the dal.
- The ground paste freezes well. Make a double batch and store half for another use.
- Add the vada squares only in the last minute of cooking. They need barely any time in the gravy and will go mushy if left to boil.
Serving and Storing Suggestions
Serves 4 people. Total time is about 1 hour 15 minutes, including the 1 hour dal soaking time, with about 45 minutes of active work. Serve hot with plain dosa, idli, or soft white rice. Leftovers store well in a sealed container in the refrigerator for up to two days. Reheat gently on the stovetop with a splash of water because the vada pieces absorb the gravy as they sit and the curry thickens considerably overnight.
Similar Recipes
- Kadalai Curry (Black Chickpea Curry)
- Paruppu Vadai (Fried Lentil Fritters)
- Chana Masala with Coconut Gravy
- Idli Sambar
- Kothu Idli
Nutrient Benefits
Both Bengal gram dal and toor dal bring solid protein and dietary fibre to this dish, which is worth noting because the meal looks heavy but is actually quite balanced. The poppy seeds add calcium and the fresh coconut contributes healthy fats. Because the vada is steamed rather than fried, the overall fat content stays lower than a traditional version, making this a genuinely practical choice for anyone trying to eat well without giving up food that has real flavour.
Steamed Vada Curry
Ingredients
For Gravy
- 3 Onions (large)
- 1/4 kg Tomatoes
- 6 flakes Garlic (peeled)
- 1 tsp Ginger Garlic Paste
- Salt (as required)
- 1/2 tsp Turmeric Powder
Grind to paste:
- 1/4 cup Fresh Coconut - 1/4 cup grated
- 10 Green Chillies - 10
- 1 tbsp Poppy Seeds
- Cinnamon (few)
- Cloves (few)
For Vadai
- 1/2 cup Bengal Gram Dal
- 1/4 cup Toor Dal
- 6 Red Chillies
- 1/4 tsp Aniseed
- 1/4 cup Small Onions (finely chopped)
- 1 tbsp Coriander Leaves (cut)
Instructions
For Vada
- Soak toor dal and bengal gram dal together in water for 1 hour.
- Strain water and grind to coarse paste.
- Powder red chillies and aniseed and add to the ground paste at the end, along with salt and blend well.
- Add chopped onions, coriander leaves and mix well.
- Pour this on a greased big idli plate and steam cook in pressure cooker for 8 to 10 minutes.
- Allow it to cool and cut into medium sized squares.
For Gravy:
- Slice onions lengthwise and chop tomatoes into very fine pieces.
- Heat oil in a kadai, add garlic, onions and fry till it turns golden brown.
- Add ginger garlic paste and tomatoes.
- Stir till it turns pulpy.
- Mix ground paste, turmeric powder and salt.
- Fry the paste for few minutes till pleasant aroma comes.
- Pour 3 cups of water and boil for few minutes.
- Cut steamed vada into pieces and add to the gravy.
- Boil for a minute and remove from fire.
- Garnish with coriander leaves and curry leaves.
Sign up for our newsletter
Add Awesome Cuisine as a Preferred Source

Frequently Asked Questions
My vada mixture is too wet and is not holding shape on the idli plate. What went wrong?
You likely did not strain the soaked dal thoroughly enough before grinding. Squeeze out as much water as you can before the dal goes into the grinder. The paste should be stiff and coarse, not runny. If it is already too loose, add a small handful of roasted gram flour to firm it up before steaming.
Can I use dried coconut instead of fresh grated coconut in the paste?
It is better not to. Dried coconut does not grind as smoothly and gives the gravy a slightly gritty texture. Fresh coconut also brings a natural moisture that helps the paste blend into the oil properly when you fry it. If fresh coconut is hard to find, frozen grated coconut, thawed and drained, works reasonably well.
The gravy tastes too spicy after adding all ten green chillies. Can I reduce them?
Yes, reduce to six or seven if your household is sensitive to heat. The coconut and poppy seed paste does mellow the chilli sharpness, but ten is genuinely hot for most palates. Deseed the chillies before grinding if you want the green chilli flavour without the full heat.
The steamed vada squares broke apart when I added them to the gravy. How do I prevent that?
Two things cause this. One is adding the pieces before the gravy has finished reducing, which makes them too wet too quickly. The other is cutting them while still warm. Make sure the steamed vada is completely cool and firm before cutting, and add the pieces only in the final minute before you take the kadai off the heat.
Can I prepare the vada a day ahead and add it to fresh gravy the next morning?
Yes, and this is actually a good way to manage the work. Steam the vada, cool it, cut it into squares, and refrigerate in a sealed container overnight. The next morning, make the gravy fresh, add the squares at the end, and the dish will taste just as good. The vada stays firm overnight and holds up well when added to hot gravy.